Before going into more details have a look at this.
Prerequisite for Creating this :
Android studio Installed in your pc.
Now Let's start our project with full enthusiasm

Step 1 : Create New project with Name AgeApp
- firstly go into File(in top most left corner) -> New -> New Project
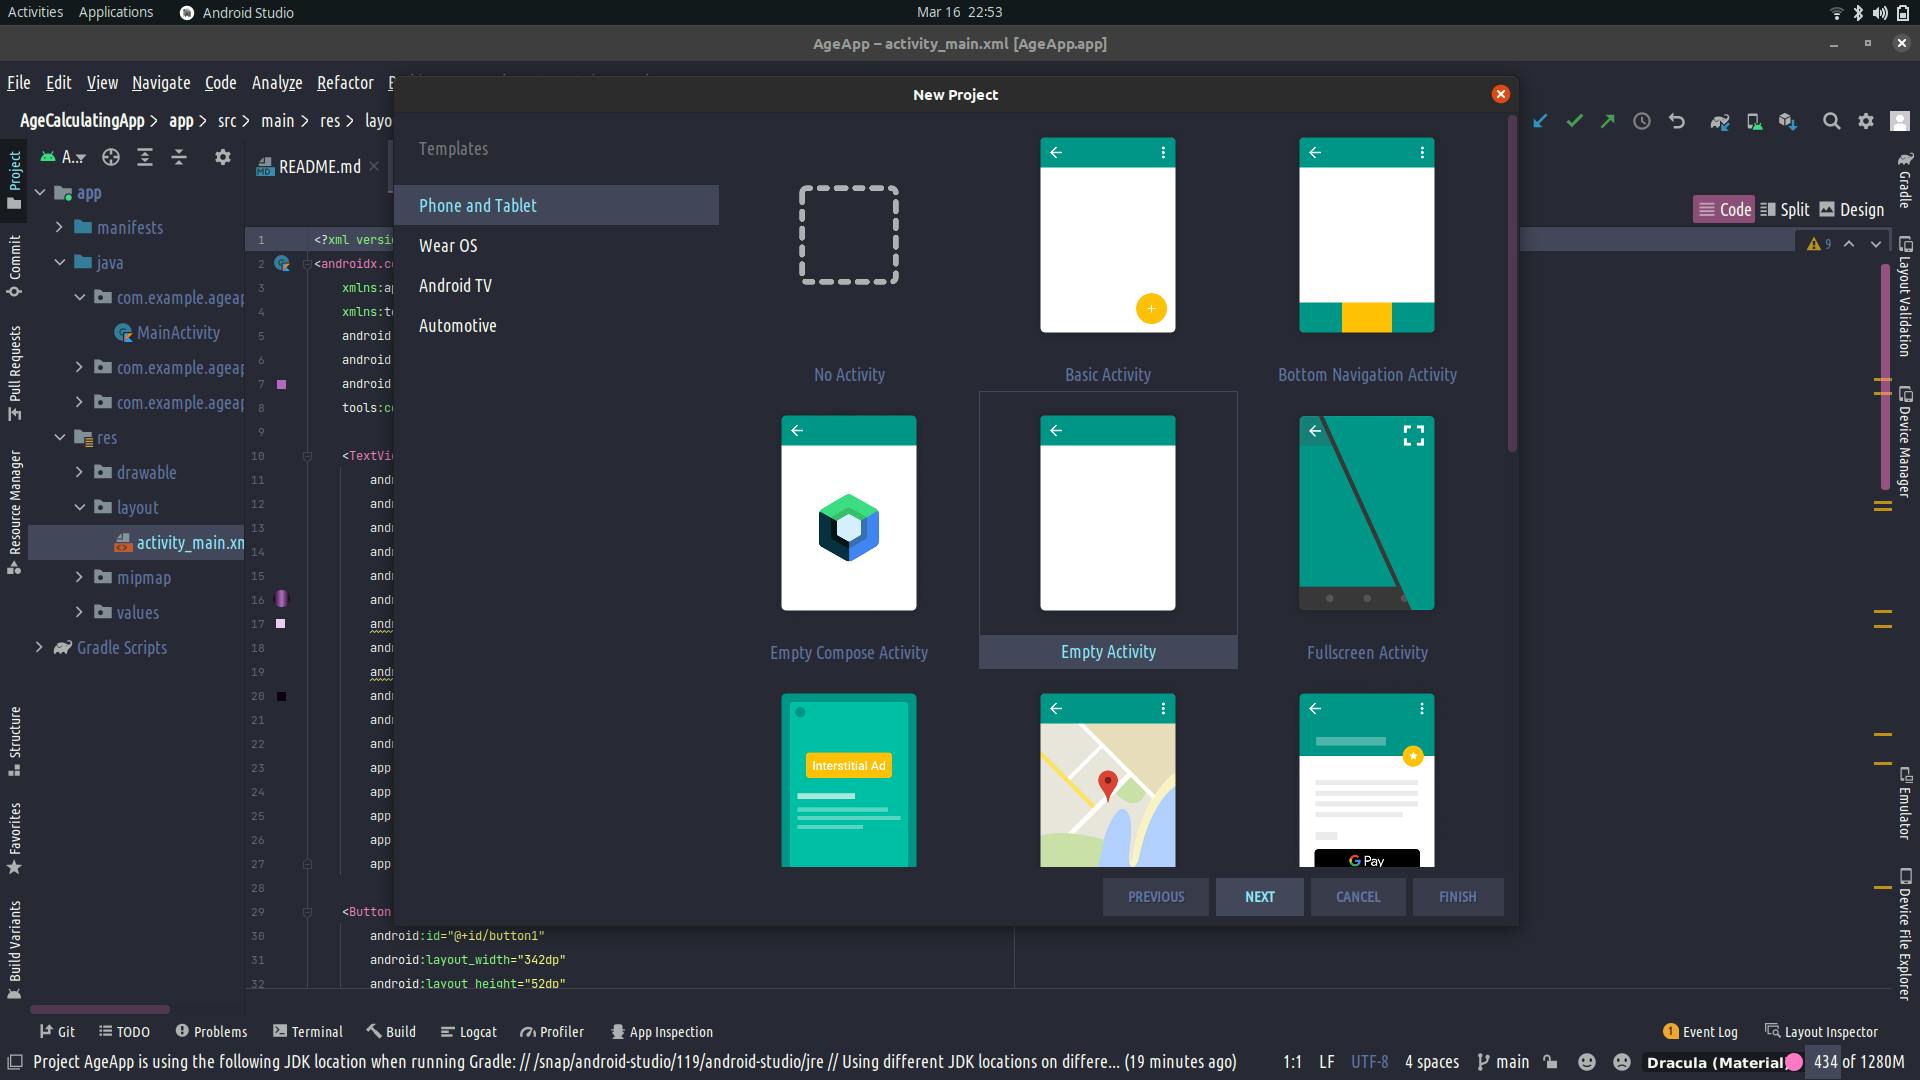
Then a screen Opens like that:

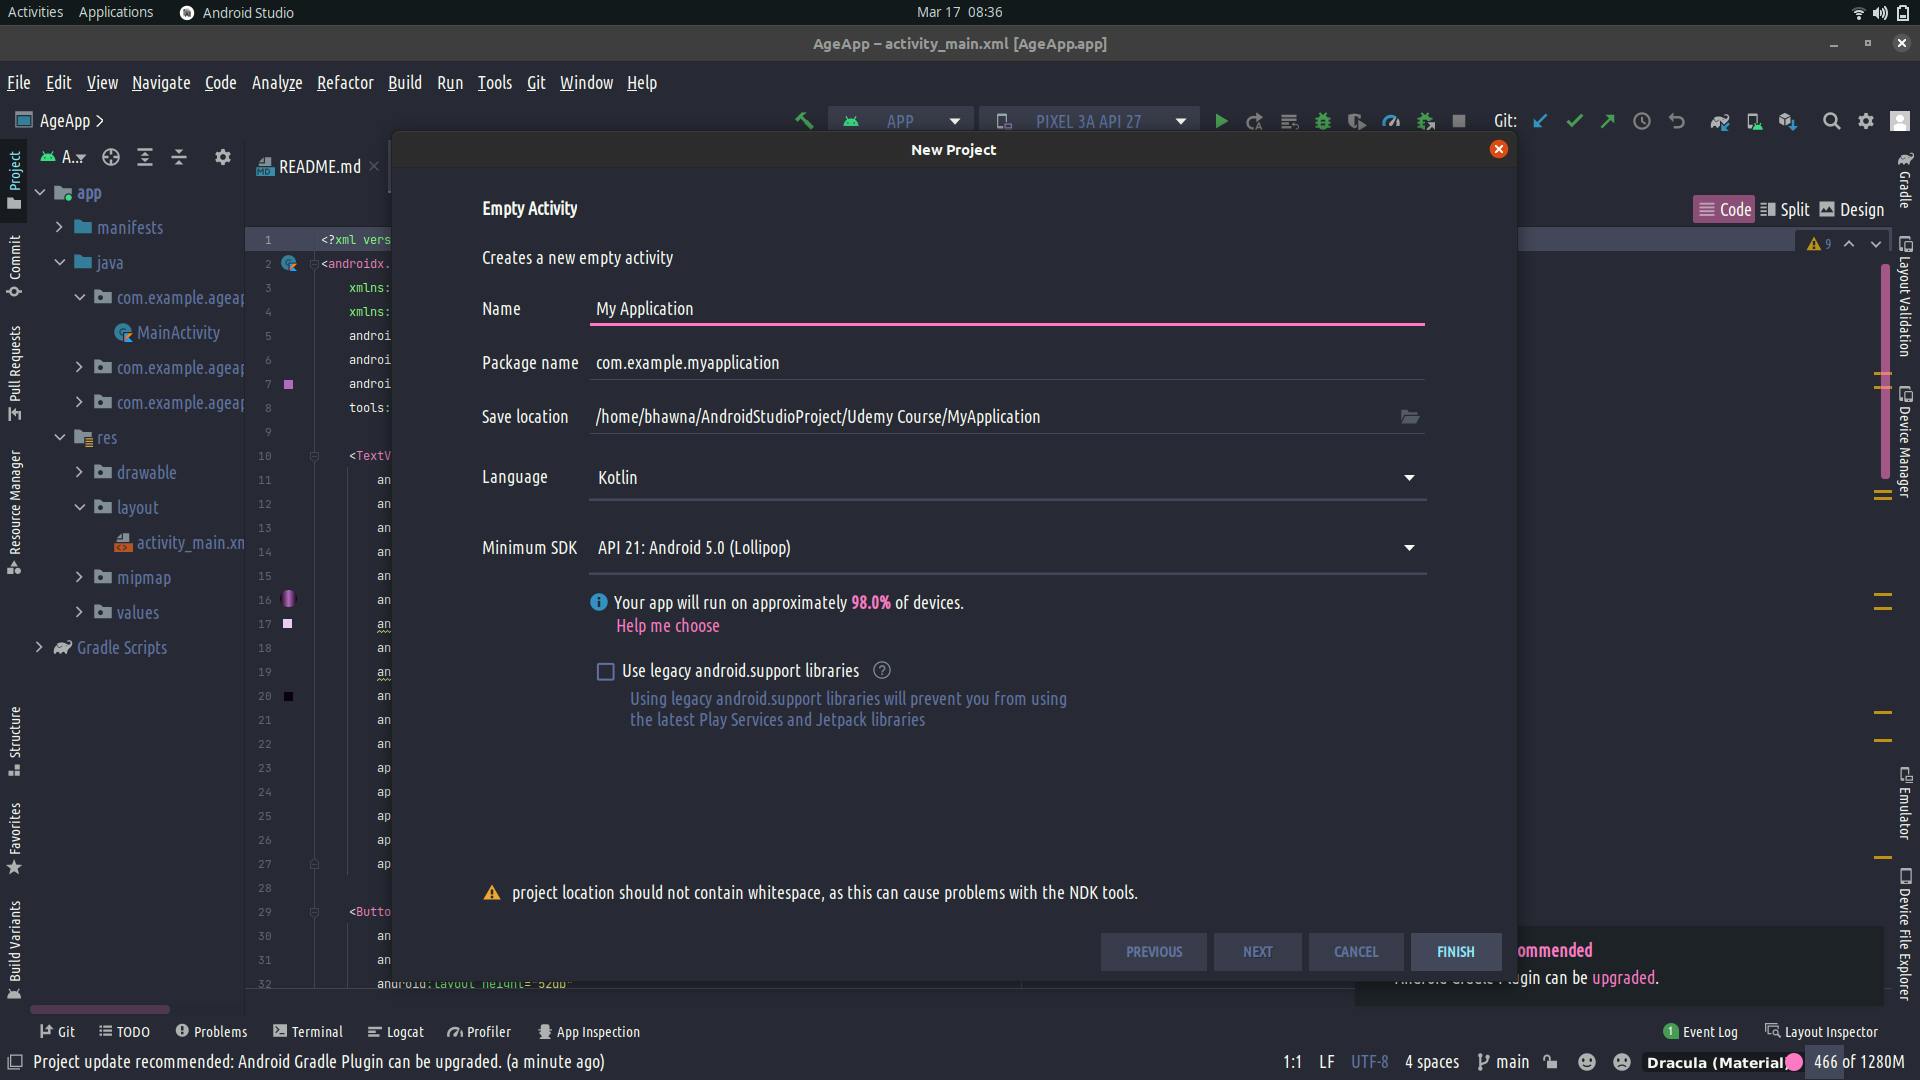
- Then select Empty Activity. A new window opens like that
 Now you need to change the name of the app and Location (as accordance where you want to save the app) and then change the language to Kotlin and SDK to API -21.
Congrates you created your first app.
Step 2 : Working on UI of the app
Here we are working on two important file i.e activity_main.xml and MainActivity.kt. (In activity_main.xml we create the UI of the app and for interacting this with MainActivity.kt(containing logic part) using id's)
Let's open Activity_main.xml and write this code on it.
<?xml version="1.0" encoding="utf-8"?>
<LinearLayout xmlns:android="http://schemas.android.com/apk/res/android"
    xmlns:app="http://schemas.android.com/apk/res-auto"
    xmlns:tools="http://schemas.android.com/tools"
    android:layout_width="match_parent"
    android:layout_height="match_parent"
    android:background="@color/light_Purple"
    android:gravity="center_horizontal"
    android:orientation="vertical"
    android:padding="16sp"
    tools:context=".MainActivity">

    <TextView
        android:layout_width="wrap_content"
        android:layout_height="wrap_content"
        android:layout_marginTop="20dp"
        android:fontFamily="@font/bebas_neue"
        android:text="CALCULATE YOUR"
        android:textColor="@color/white"
        android:textSize="40sp"
        android:textStyle="bold" />

    <TextView
        android:layout_width="wrap_content"
        android:layout_height="wrap_content"
        android:layout_marginTop="20dp"
        android:fontFamily="@font/bebas_neue"
        android:backgroundTint="@color/Dark_Purple"
        android:background="@drawable/rounded_corner"
        android:text="AGE"
        android:paddingLeft="20sp"
        android:paddingRight="20sp"
        android:paddingTop="5sp"
        android:paddingBottom="5sp"
        android:textColor="@color/white"
        android:textSize="40sp"
        android:textStyle="bold" />

    <TextView
        android:layout_width="wrap_content"
        android:layout_height="wrap_content"
        android:layout_marginTop="20dp"
        android:fontFamily="@font/bebas_neue"
        android:text="IN MINUTES"
        android:textColor="@color/white"
        android:textSize="40sp"
        android:textStyle="bold" />

    <Button
        android:id="@+id/btnDatePicker"
        android:layout_marginTop="40dp"
        android:layout_width="match_parent"
        android:layout_height="wrap_content"
        android:text="SELECT DATE"
        android:textSize="30sp"
        android:fontFamily="@font/bebas_neue"
        android:textStyle="bold"
        android:backgroundTint="@color/white"
        android:textColor="@color/Dark_Purple"/>

    <TextView
        android:id="@+id/tvSelectedDate"
        android:layout_marginTop="45sp"
        android:layout_width="wrap_content"
        android:layout_height="wrap_content"
        android:text="17/03/22"
        android:textSize="35sp"
        android:textStyle="bold"
        android:textColor="@color/white"
        />

    <TextView
        android:layout_width="wrap_content"
        android:layout_height="wrap_content"
        android:text="Selected Date"
        android:textColor="#560963"
        android:textSize="20sp"
        android:textStyle="bold" />

    <TextView
        android:id="@+id/tvSelectedDateInMinutes"
        android:layout_marginTop="45sp"
        android:layout_width="wrap_content"
        android:layout_height="wrap_content"
        android:text="1709823"
        android:textSize="35sp"
        android:textStyle="bold"
        android:textColor="@color/white"
        />
    <TextView
        android:layout_width="wrap_content"
        android:layout_height="wrap_content"
        android:text="In Minutes Till date"
        android:textStyle="bold"
        android:textSize="20sp"
        android:textColor="#560963"
        />

</LinearLayout>
- Let's open MainActivity.kt and write this code in it.
package com.example.ageapp

import android.app.DatePickerDialog
import androidx.appcompat.app.AppCompatActivity
import android.os.Bundle
import android.view.View
import android.widget.Button
import android.widget.TextView
import android.widget.Toast
import java.text.SimpleDateFormat
import java.util.*

class MainActivity : AppCompatActivity() {
    override fun onCreate(savedInstanceState: Bundle?) {
        super.onCreate(savedInstanceState)
        setContentView(R.layout.activity_main)
        //reference the btnDatePicker from the layout
        val btnDatePicker: Button = findViewById(R.id.btnDatePicker)
        //set onclicklistener to btnDatePicker
        btnDatePicker.setOnClickListener {
            //call clickDatePicker when this button is clicked
            clickDatePicker()
        }
    }

    //function to show the date picker
    fun clickDatePicker() {
        /**
         * This Gets a calendar using the default time zone and locale.
         * The calender returned is based on the current time
         * in the default time zone with the default.
         */
        val myCalendar = Calendar.getInstance()
        val year = myCalendar.get(Calendar.YEAR)
        val month = myCalendar.get(Calendar.MONTH)
        val day = myCalendar.get(Calendar.DAY_OF_MONTH)

        //get the id of the textviews from the layout
        val tvSelectedDate: TextView = findViewById(R.id.tvSelectedDate)
        val tvSelectedDateInMinutes: TextView = findViewById(R.id.tvSelectedDateInMinutes)

        /**
         * Creates a new date picker dialog for the specified date using the parent
         * context's default date picker dialog theme.
         */
        val dpd = DatePickerDialog(
            this, { _, selectedYear, selectedMonth, selectedDayOfMonth ->
                /**
                 * The listener used to indicate the user has finished selecting a date.
                 */

                /**
                 *Here the selected date is set into format i.e : day/Month/Year
                 * And the month is counted in java is 0 to 11 so we need to add +1 so it can be as selected.
                 * */
                val selectedDate = "$selectedDayOfMonth/${selectedMonth + 1}/$selectedYear"
                // Selected date it set to the TextView to make it visible to user.
                tvSelectedDate.text = selectedDate

                /**
                 * Here we have taken an instance of Date Formatter as it will format our
                 * selected date in the format which we pass it as an parameter and Locale.
                 * Here I have passed the format as dd/MM/yyyy.
                 */
                val sdf = SimpleDateFormat("dd/MM/yyyy", Locale.ENGLISH)
                // The formatter will parse the selected date in to Date object
                // so we can simply get date in to milliseconds.
                val theDate = sdf.parse(selectedDate)
                //use the safe call operator with .let to avoid app crashing it theDate is null
                theDate?.let {
                    /** Here we have get the time in milliSeconds from Date object
                     * And as we know the formula as milliseconds can be converted to second by dividing it by 1000.
                     * And the seconds can be converted to minutes by dividing it by 60.
                     * So now in the selected date into minutes.
                     */
                    val selectedDateInMinutes = theDate.time / 60000
                    // Here we have parsed the current date with the Date Formatter which is used above.
                    val currentDate = sdf.parse(sdf.format(System.currentTimeMillis()))
                    //use the safe call operator with .let to avoid app crashing it currentDate is null
                    currentDate?.let {
                        // Current date in to minutes.
                        val currentDateToMinutes = currentDate.time / 60000

                        /**
                         * Now to get the difference into minutes.
                         * We will subtract the selectedDateToMinutes from currentDateToMinutes.
                         * Which will provide the difference in minutes.
                         */
                        val differenceInMinutes = currentDateToMinutes - selectedDateInMinutes
                        tvSelectedDateInMinutes.text = differenceInMinutes.toString()
                    }
                }
            },
            year, month, day
        )

        /**
         * Sets the maximal date supported by this in
         * milliseconds since January 1, 1970 00:00:00 in time zone.
         *
         * @param maxDate The maximal supported date.
         */
        // 86400000 is milliseconds of 24 Hours. Which is used to restrict the user from selecting today and future day.
        dpd.datePicker.maxDate = System.currentTimeMillis() - 86400000
        dpd.show()

    }
}
Now let's run the code you will get your first app running i tried to explain all the things in the code and a look .
If you face any issues let's connect me on Twitter Twitter
For the complete code. Visit my Github link : Github Code
